Android Fragment Lifecycle Explained – Complete Guide with Real Examples (Kotlin & Java)
Learn Android Fragment Lifecycle in detail with real examples. Understand onCreateView, onViewCreated, onStart, onResume and more in Kotlin and Java.

Introduction
After understanding Activity Lifecycle, the next important concept is Fragment Lifecycle.
If Activity is a full screen, then Fragment is a section of that screen.
For example:
-
WhatsApp → Chat screen = Activity
-
Chat list tab = Fragment
-
Status tab = Fragment
-
Calls tab = Fragment
Fragments allow us to create modular, reusable UI components.
But like Activities, Fragments also go through lifecycle states. And this lifecycle is slightly more complex.
Understanding Fragment lifecycle properly is essential when building:
-
Tab layouts
-
Dashboard screens
-
POS dashboards
-
ViewPager screens
-
Multi-pane layouts
Let’s break it down clearly.
What is a Fragment?
A Fragment is a reusable UI component that must live inside an Activity.
Important point:
👉 Fragment cannot exist without an Activity.
👉 Activity can exist without a Fragment.
Fragment lifecycle is closely connected to Activity lifecycle.
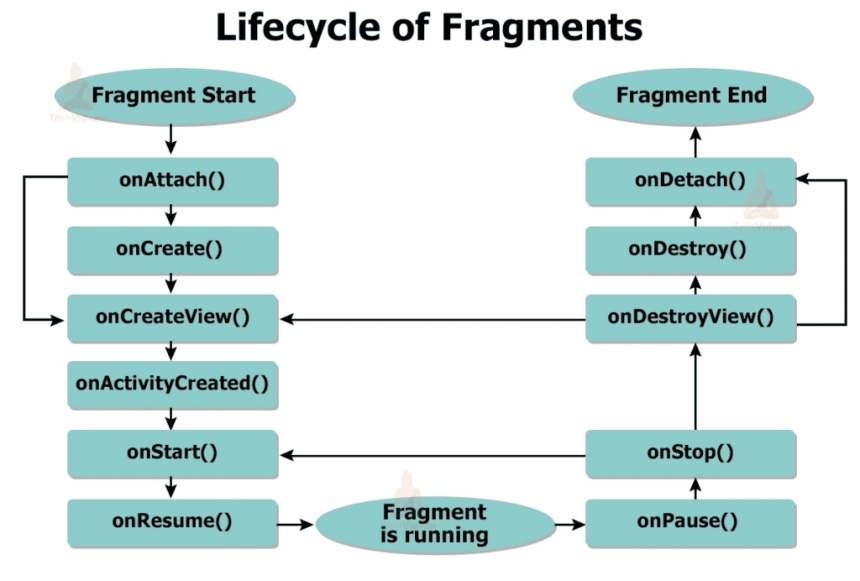
Complete Fragment Lifecycle Methods
Main methods:
It looks complex, but we will simplify it.
Fragment Lifecycle Flow (Simple View)
When Fragment is added:
When Fragment is removed:
1. onAttach() – Fragment Attached to Activity
Called when Fragment connects to Activity.
Kotlin:
Used for:
-
Getting Activity reference
-
Initial setup
2. onCreate() – Fragment Created
Similar to Activity’s onCreate, but UI is NOT created here.
Used for:
-
Initializing variables
-
Preparing data
3. onCreateView() – UI is Created (Most Important)
This is where Fragment layout is inflated.
Kotlin:
Java:
This method creates the UI.
Very important.
4. onViewCreated() – UI Ready
Called after onCreateView.
Used for:
-
Setting click listeners
-
Initializing RecyclerView
-
Binding data
Kotlin:
Professional developers usually handle UI setup here.
5. onStart() and onResume()
Same meaning as Activity:
-
onStart → Fragment visible
-
onResume → User interacting
Real Example – Tab Layout Scenario
Imagine dashboard with 3 tabs:
-
Sales
-
Products
-
Customers
When you switch tab:
Old fragment:
New fragment:
If fragment is removed completely:
Important Difference: onDestroyView() vs onDestroy()
This is where many beginners get confused.
onDestroyView()
Called when UI is destroyed but Fragment object still exists.
Example:
-
Fragment in ViewPager
-
Fragment replaced
Use this to:
-
Clear view binding
-
Release UI references
onDestroy()
Called when Fragment instance is fully destroyed.
Use this to:
-
Cleanup data
-
Remove listeners
Why Fragment Lifecycle is More Complex?
Because Fragment has two lifecycles:
-
Fragment lifecycle
-
Fragment View lifecycle
The View lifecycle starts in:
And ends in:
This separation prevents memory leaks.
Real Production Example (POS Dashboard)
Imagine POS app dashboard:
Activity → DashboardActivity
Fragments:
-
SalesFragment
-
StockFragment
-
ReportsFragment
When switching fragments:
Only fragment lifecycle changes, Activity stays alive.
This makes app more efficient.
Common Beginner Mistakes
❌ Initializing UI in onCreate()
❌ Not clearing binding in onDestroyView()
❌ Loading heavy data in onResume repeatedly
Correct approach:
-
Inflate UI in onCreateView
-
Setup UI in onViewCreated
-
Clear binding in onDestroyView
Fragment vs Activity Lifecycle (Quick Comparison)
| Feature | Activity | Fragment |
|---|---|---|
| Independent | Yes | No |
| Needs container | No | Yes |
| Has onCreateView | No | Yes |
| Has onDestroyView | No | Yes |
| Reusable UI | No | Yes |
When Should You Use Fragments?
Use Fragment when:
-
You need reusable UI sections
-
You use tab layout
-
You use ViewPager
-
You want modular design
-
You build scalable apps
Modern Android apps heavily use Fragments.
Conclusion
Fragment Lifecycle may look complicated initially, but once you understand the separation between:
-
Fragment lifecycle
-
View lifecycle
Everything becomes logical.
Fragments are powerful tools for building scalable and modular Android applications.
If you master Activity and Fragment lifecycle properly, you are already ahead of many beginners.
Share
What's Your Reaction?
 Like
0
Like
0
 Dislike
0
Dislike
0
 Love
0
Love
0
 Funny
0
Funny
0
 Angry
0
Angry
0
 Sad
0
Sad
0
 Wow
0
Wow
0