Android LinearLayout Explained – Complete Beginner to Advanced Guide (Kotlin & Java)
Learn Android LinearLayout with examples. Understand orientation, layout_weight, and real UI design using Kotlin and Java.

Introduction
When building Android user interfaces, layouts play a crucial role. Layouts define how UI components like buttons, text fields, and images are arranged on the screen.
One of the simplest and most commonly used layouts in Android is LinearLayout.
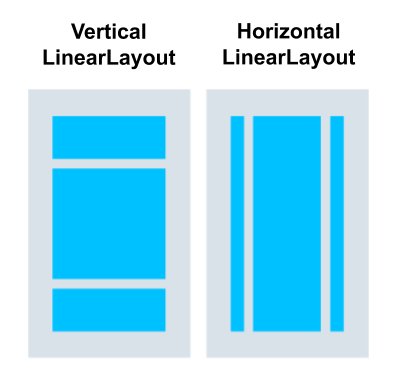
LinearLayout arranges UI elements in a single direction — either vertically or horizontally.
This makes it very easy to build simple UI structures such as login forms, product lists, and dashboard sections.
Let’s understand how LinearLayout works.
What is LinearLayout?
LinearLayout is a ViewGroup that arranges its child views in a single line.
That line can be:
-
Vertical
-
Horizontal
Example structure:
├── TextView
├── EditText
└── Button
Each view appears one after another.
LinearLayout Orientation
Orientation determines the direction of layout.
There are two types:
-
Vertical
-
Horizontal
Vertical LinearLayout
Views are arranged from top to bottom.
Example:
android:orientation="vertical"
android:layout_width="match_parent"
android:layout_height="match_parent">
<TextView
android:text="Username"/>
<EditText
android:hint="Enter username"/>
<Button
android:text="Login"/>
</LinearLayout>
Result:
[Enter username]
[Login Button]
This layout is commonly used for forms.
Horizontal LinearLayout
Views are arranged left to right.
Example:
android:orientation="horizontal"
android:layout_width="match_parent"
android:layout_height="wrap_content">
<ImageView
android:layout_width="50dp"
android:layout_height="50dp"/>
<TextView
android:text="Product Name"/>
</LinearLayout>
Result:
This layout is often used in list items.
layout_weight Explained
One powerful feature of LinearLayout is layout_weight.
It allows views to share available space.
Example:
android:orientation="horizontal"
android:layout_width="match_parent"
android:layout_height="wrap_content">
<Button
android:layout_weight="1"
android:layout_width="0dp"
android:text="Cancel"/>
<Button
android:layout_weight="1"
android:layout_width="0dp"
android:text="Submit"/>
</LinearLayout>
Result:
Both buttons take equal width.
Why layout_width Must Be 0dp
When using weight:
Because weight controls size.
If width is wrap_content, weight may not work correctly.
Example – Equal Columns Layout
android:orientation="horizontal"
android:layout_width="match_parent"
android:layout_height="wrap_content">
<TextView
android:layout_weight="1"
android:layout_width="0dp"
android:text="Price"/>
<TextView
android:layout_weight="1"
android:layout_width="0dp"
android:text="Qty"/>
<TextView
android:layout_weight="1"
android:layout_width="0dp"
android:text="Total"/>
</LinearLayout>
Perfect for billing screens in POS apps.
Nested LinearLayouts
You can place LinearLayouts inside each other.
Example:
├── LinearLayout (horizontal)
├── LinearLayout (horizontal)
└── LinearLayout (horizontal)
Example UI:
Quantity Total
[Checkout Button]
But too many nested layouts can slow UI.
Performance Consideration
LinearLayout is simple but can become inefficient when heavily nested.
Example bad structure:
└── LinearLayout
└── LinearLayout
└── LinearLayout
Too many nested layers increase rendering time.
Modern apps often prefer ConstraintLayout.
Real Production Example – Login Screen
Example login screen layout:
android:orientation="vertical"
android:padding="16dp"
android:layout_width="match_parent"
android:layout_height="match_parent">
<EditText
android:hint="Email"/>
<EditText
android:hint="Password"/>
<Button
android:text="Login"/>
</LinearLayout>
Simple and clean.
Real Production Example – POS Billing Row
Billing item row:
Using LinearLayout horizontal with weights.
This is common in POS apps.
LinearLayout Attributes
Important attributes:
| Attribute | Purpose |
|---|---|
| orientation | Direction of layout |
| layout_weight | Space distribution |
| gravity | Align children |
| layout_gravity | Position child |
| padding | Inner spacing |
Gravity vs Layout Gravity
Example:
layout_gravity → position of view inside parent
Example:
Centers children.
Common Beginner Mistakes
❌ Too many nested LinearLayouts
❌ Incorrect weight usage
❌ Forgetting orientation
❌ Mixing match_parent with weight incorrectly
Always design layout carefully.
Interview-Level Answer
If interviewer asks:
“What is LinearLayout?”
Professional answer:
LinearLayout is a ViewGroup that arranges its child views in a single direction, either vertically or horizontally. It also supports weight-based space distribution.
Simple Summary
LinearLayout arranges UI elements:
Horizontal → Left to Right
Key feature:
Conclusion
LinearLayout is one of the simplest layouts in Android, making it perfect for beginners. It allows developers to quickly arrange UI components in vertical or horizontal structures.
Although modern apps often use ConstraintLayout for complex designs, LinearLayout is still widely used for simple layouts like forms, rows, and sections.
Understanding LinearLayout is an important step in mastering Android UI design.
Share
What's Your Reaction?
 Like
0
Like
0
 Dislike
0
Dislike
0
 Love
0
Love
0
 Funny
0
Funny
0
 Angry
0
Angry
0
 Sad
0
Sad
0
 Wow
0
Wow
0