Android ConstraintLayout Explained – Modern UI Design Guide for Kotlin and Java Developers
Learn Android ConstraintLayout with practical examples. Understand constraints, chains, bias, and responsive UI design using Kotlin and Java.

Introduction
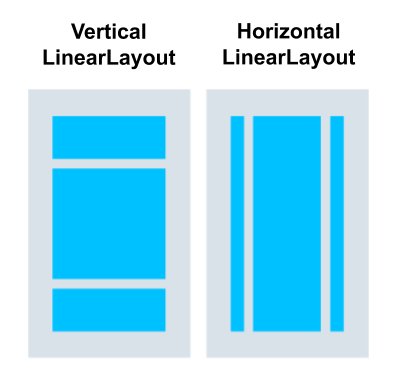
When Android was first released, developers mostly used LinearLayout and RelativeLayout to design screens. But as apps became more complex, these layouts created deep nesting and performance issues.
To solve this problem, Google introduced ConstraintLayout.
ConstraintLayout allows developers to create complex layouts using a flat view hierarchy, which improves performance and flexibility.
Today, ConstraintLayout is considered the recommended layout for modern Android UI design.
What is ConstraintLayout?
ConstraintLayout is a ViewGroup that allows you to position views by defining constraints relative to other views or the parent layout.
Instead of stacking views vertically or horizontally, you connect them using constraints.
Example structure:
├── ImageView
├── TextView
└── Button
Each view defines where it should appear using constraints.
What are Constraints?
Constraints define the position of a view relative to another view or parent container.
Example constraint:
This means:
The top of this view is connected to the top of the parent layout.
Example:
android:text="Welcome"
app:layout_constraintTop_toTopOf="parent"
app:layout_constraintStart_toStartOf="parent"/>
This places the TextView at the top-left corner.
Basic ConstraintLayout Example
android:layout_width="match_parent"
android:layout_height="match_parent">
<TextView
android:id="@+id/title"
android:text="Login"
app:layout_constraintTop_toTopOf="parent"
app:layout_constraintStart_toStartOf="parent"
app:layout_constraintEnd_toEndOf="parent"/>
</androidx.constraintlayout.widget.ConstraintLayout>
This centers the title horizontally at the top.
Centering a View
To center a view, connect both sides to parent.
Example:
app:layout_constraintEnd_toEndOf="parent"
Android automatically centers the view.
Example:
android:text="Welcome"
app:layout_constraintTop_toTopOf="parent"
app:layout_constraintStart_toStartOf="parent"
app:layout_constraintEnd_toEndOf="parent"/>
ConstraintLayout Bias
Bias controls position between two constraints.
Example:
Range:
0.5 → center
1.0 → right
Example:
android:text="Hello"
app:layout_constraintStart_toStartOf="parent"
app:layout_constraintEnd_toEndOf="parent"
app:layout_constraintHorizontal_bias="0.2"/>
This moves the view closer to the left.
Constraint Chains
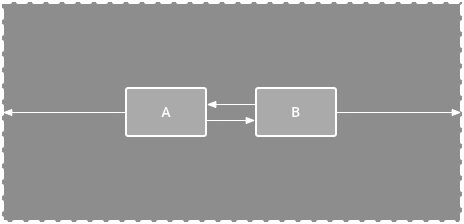
Chains allow multiple views to share space.
Example:
Each button connected horizontally.
Example:
app:layout_constraintEnd_toStartOf="@id/button2"
Chains help distribute views evenly.
Match Constraints (0dp)
In ConstraintLayout:
means match constraints.
This allows view to expand between constraints.
Example:
android:layout_width="0dp"
app:layout_constraintStart_toStartOf="parent"
app:layout_constraintEnd_toEndOf="parent"/>
TextView stretches across screen.
Real Production Example – Login Screen
Example login layout:
<EditText
android:id="@+id/email"
android:hint="Email"
app:layout_constraintTop_toTopOf="parent"
app:layout_constraintStart_toStartOf="parent"
app:layout_constraintEnd_toEndOf="parent"/>
<EditText
android:id="@+id/password"
android:hint="Password"
app:layout_constraintTop_toBottomOf="@id/email"
app:layout_constraintStart_toStartOf="parent"
app:layout_constraintEnd_toEndOf="parent"/>
<Button
android:text="Login"
app:layout_constraintTop_toBottomOf="@id/password"
app:layout_constraintStart_toStartOf="parent"
app:layout_constraintEnd_toEndOf="parent"/>
</androidx.constraintlayout.widget.ConstraintLayout>
This creates a clean login screen.
Why ConstraintLayout is Better
Advantages:
-
Flat hierarchy
-
Better performance
-
Flexible UI positioning
-
Responsive layout support
-
Works well with large screens
Example comparison:
Nested LinearLayouts:
└── LinearLayout
└── LinearLayout
ConstraintLayout:
├── View
├── View
└── View
Less nesting = faster rendering.
Android Studio Constraint Editor
Android Studio provides visual drag-and-drop editor.
You can:
-
Drag UI elements
-
Connect constraints visually
-
Preview layout instantly
This speeds up UI development.
Real Production Example – POS Billing Screen
POS billing UI may contain:
Quantity
Price
Total
Checkout Button
ConstraintLayout helps align these elements precisely.
It also works well for tablets and large screens.
Common Beginner Mistakes
❌ Forgetting to set both constraints
❌ Using wrap_content where match constraints needed
❌ Overusing nested layouts
❌ Ignoring constraint warnings
Always connect views properly.
Interview-Level Answer
If interviewer asks:
“What is ConstraintLayout?”
Professional answer:
ConstraintLayout is a ViewGroup that allows developers to create flexible and complex UI designs by defining positional constraints between views, resulting in a flat view hierarchy and improved performance.
Simple Summary
ConstraintLayout positions views using constraints instead of nesting layouts.
Important concepts:
Bias
Chains
Match constraints (0dp)
These allow powerful UI design.
Conclusion
ConstraintLayout is the modern standard for Android UI design. It provides flexibility, better performance, and easier layout management compared to older layouts.
If you master ConstraintLayout, you can design almost any Android screen efficiently.
Professional Android apps rely heavily on ConstraintLayout for scalable UI design.
Share
What's Your Reaction?
 Like
0
Like
0
 Dislike
0
Dislike
0
 Love
0
Love
0
 Funny
0
Funny
0
 Angry
0
Angry
0
 Sad
0
Sad
0
 Wow
0
Wow
0